Deborah R. Fowler
Trigonometry (triangles) with a little linear
algebra (vector math) and dot products (algebraic operation)
Posted on June 11 2022
Updated on June 17 2022
I have been using trigonometry for years and thought that an overview of the basic principles might be helpful for those less familiar.
This is not meant to be a comprehensive study, but rather a handful of useful things to know when working in Houdini, in particular with procedural animation and effects. There are many sites that can be found online if you are interested in delving deeper.
Recently I have been using these principles to create short animations, prior to that I created many solution sample files which you will find on my math for vsfx, tips and tricks and (since H13) wrangle node pages. Here are some recent visual demos pertaining to these principles and a general overview.
If you prefer video format:
For a step-by-step document see below.
Overview
Although I have labeled this trigonometry which is defined as the branch of math that is concerned with angles and triangles, I will also touch on vector math as well as dot products.
A right-angled triangle, is a triangle where one angle is 90 degrees. The longest side is the hypotenuse (hyp) and the other two sides are sometimes called the adjacent (adj) and opposite (opp) - in relation to the angle that is being discussed. The side that is touching the angle is the adjacent and the side opposite the angle is opposite. Before we start talking about Pythagorean's theorem and the dot product, let's look at the basics in diagram form in the video below.
Review of basic concepts:
In a right-angled triangle, there are properties that exist. You may have memorized in high school. Reviewing them here are:
- cos (angle) =
adj / hyp where adj is the side
that is touching the angle, hyp is the longest side (if it
wasn't you wouldn't have a triangle)
- sin (angle) =
opp / hyp where opp is the side
that is opposite from the angle, not touching
- tan (angle) = opp / adj
You may recall we use these properties to
convert from polar to cartesian
coordinates. Well, in procedural animation, it is usually
the angle that we are after. If we take the inverse cos which
can be written cos -1 or arc cos abbreviated as acos we then get
the following:
- angle = acos (adj / hyp)
- angle = asin (opp / hyp)
- angle = atan (opp / adj)
These can be incredibly useful depending on
which sides we know.
So that's all very theoretical, what does it
look like in action in Houdini? Well, the angle
arc you see I am currently calculating by these
formulas. I have set up the points to be defined so I know the
point locations. This means that I can find the lengths of the
sides. For now, I'm going to use opp and adj since there is no
use of any formulas other than the differences between the x
coordinates and the y coordinates.
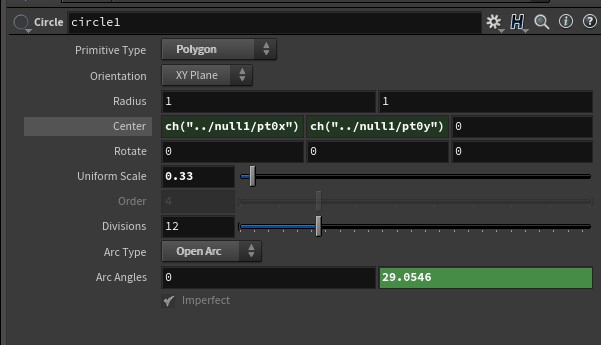
I happened to set up my points using an add
node and they are at locations (-1,-0.5), (0.8, -0.5), (0.8,
0.5) but I also made these adjustable by referencing them
as user-defined parameters. In the default state as seen in the
diagram above you can see the angle (a portion of a circle) is
calculated correctly by using atan(
(ch("../null1/pt2y")-ch("../null1/pt1y")) /
(ch("../null1/pt1x")-ch("../null1/pt0x")) ) which
evaluates to 29.0546 degrees. In other words, atan(1/1.8).
Recall atan is opp/adj so opp is length 1 and adj is length 1.8.
Exercise: (if you get
stuck, hiplc here)
|
In my example, I used user defined parameters in a null node and referenced the points so that it is more general.

As you can see below, this evaluates as expected
So in action in Houdini, atan gives the correct angle. You can use this as long as you know the locations of the points, or really the lengths of the opposite and adjacent sides. We could do this using the hypotenuse as well, but that would take more calculation based on Pythagorean theorem. We will review that later (or if you want to review now, see my video on what I call the 2-point constraint problem).
Let's take a look at a less point based example. What if you had a butterfly wing that was being pushed by a rod? For example in a wooden automaton https://www.youtube.com/watch?v=GIiujiVO-qU
Starting with a simple example, we can push the wing up with the tube. Let's suppose first the pivot point of the wing is at zero. Using the bbox of the tube and grabbing the D_YMAX value (the maximum value of Y from zero) we have the y value and the distance from the wing to the tube is our x value. If we draw the triangle relationship we can see we have the information we need to calculate the angle.
The information is used in the parameter for rotatez.

Note that this method works going up or down as the tube does lower than the pivot point. The triangle relationship holds.
These do not have to be smooth functions such as sin and cos
controlling the stick movement - it can be any function. See
below.
So far though we have been assuming that the lines are just that, lines. A bit more calculation is required when the object has thickness and you don't want the object to rotate on the bottom line.
For the butterfly wings, we have done all we need.
A more generalized version can be found here with a thickness explanation.