Deborah R. Fowler
Sprinkles
Posted Dec 28 2023keywords: particles, procedural animation, redshift, pop grains, attribute transfer, filecache, attribute delete
Created in Houdini 19.5.303 LC.
See also Peach Powder Puff
Sprinkles
A few issues came up with this one, one was popping behavior (usually lack of substeps but also weight on the clumping was too high). The second was attribute transfer misuse (described below, just because it "works" doesn't mean it is correct - a test render tells all)
attribute transfer
Using a similar technique, but adding an attribute transfer to transfer the colors from the moving cubes to the particles. This required some attribute transfer wrangling.
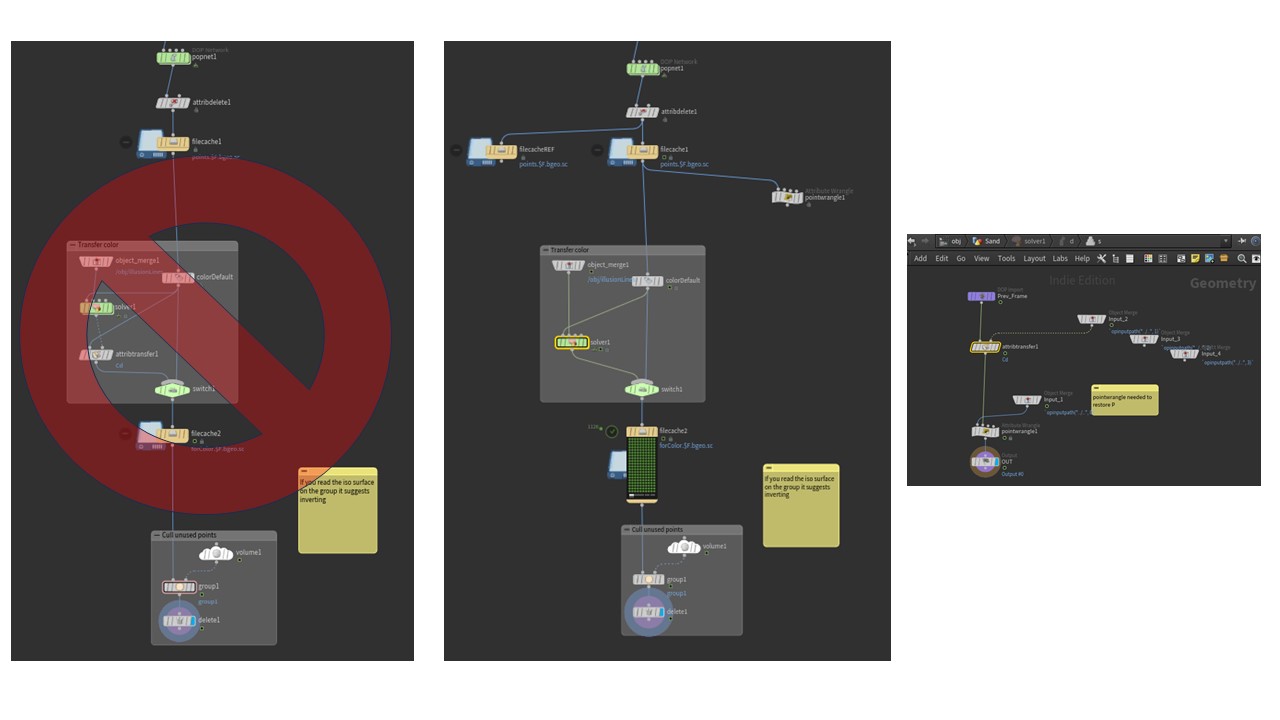
Normally you use attribute transfer with no issues, and if you want the attributes to stay, you apply a sop solver to allow access to the previous position. I found that the attribute transfer was overriding my point position. Despite listing only Cd and ^P the points were being moved to the previous frame, toggling the checkboxes as well. I have used attribute transfer for many purposes but this particular case was unusual. The usual attribute transfer was inside a SOP solver to keep the value from each previous step. I mistakenly tried putting an attribute transfer outside the level to maintain the correct point position. After seeing popping of the colors during rendering, I realized that was not the best method - google led to videos that also did not help (as was mentioned in several forums). The solution was to simply put a point wrangle inside the sop solver after the attribute transfer. Problem solved. Seen below.

This one was simmed in 5.5 hours on my personal desktop (Intel Core i9-10900CPU 2.8GHz, 128 GB RAM, NVIDIA GeForce RTX 2060) - that's the one I went with after several attempts to get out all the possible jitter/pops - (substeps can be costly, and behavior can change, this was the best of several) ... with a particle count of about 2 million (2,019,584)
Definitely culling geometry paid off for this one as did caching the Sop solver (about 52GB total - be sure to delete attributes not needed in your sim above - this was 92 on a previous iteration just from attributes) for the color transfer after having cached the particles (63GB). On a test of the last frame at 320 x 320 res it took 7 minutes, after caching the SOP solver, render time went down to 1 minute. For full resolution the render time was 4 minutes per frame.
A few notes on the above diagram - good to attribute delete any extraneous attributes before caching (usually I use some variation of * ^P ^age ^life ^id ^orient ^Cd). It won't let you delete P but I keep it there to remind me of the syntax. Life and age can be handy if you are killing particles and want to use @age/@life to get the ratio of how long a particle has lived. That can be used in an opacity value with 1-@age/@life fading the particles out over time. In this example, I was not using this technique but worth noting when determining what attributes to save.
Culling points outside of the camera frustum can also speed things up. There are examples on my tips and tricks page. Note that on the group node if you float over the "invert" checkbox it is recommended to use invert and .5. I did so and indeed found this to be faster (the other way does work as well but I had never noticed the floating help stating the efficiency). Note that I culled after the color transfer (otherwise I'd get a patch of where the camera frustum had been in my color transfer - makes sense, but test renders are good brain checks).
This one took a few trials to get the initial sim to settle as well as the color transfer and popping that appeared from lack of substeps as well as the incorrect double attribute transfer. Took 3 days to render locally - phew - on the next one.
Note that if you want to have your collision object not on at the start frame, you need to set it to the frame in the popnet.
Reminders:
- cull geometry not in the camera view
- delete attributes before caching (saves write time and reduces cache size)
- do test frames (trust but verify)
- motion blur in Redshift can be adjusted under the advanced tab with steps, frames and shutter start/end
- if your collision is not on first frame, set frame in
pop
Also on Instagram https://www.instagram.com/reel/C1Z9mFOJKl1/
and YouTube https://www.youtube.com/shorts/XszVQLCJhDo