Deborah R. Fowler
Houdini UVs
Posted Dec 13 2017Updated May 4 2020
Updated Jan 30 2024 - optimized images
In Houdini UVs are no better and no worse than in Maya imho.
One of the easiest ways to UV simple objects is by using the UV Project or UV Texture node
UV Project for example:
 This
node will project a texture in Orthographic, Polar, Cylindrical
among other. Here I will use it in an Orthographic projection.
This
node will project a texture in Orthographic, Polar, Cylindrical
among other. Here I will use it in an Orthographic projection.There are two tabs:
- Initialize - best guess to what the geometry should be uv'd
- Transformation - values that are set by initialize (or user)
 Note that uv's should occur
at the base level of the geometry, that is, before it is transformed
or deformed so that they "stick" properly.
Note that uv's should occur
at the base level of the geometry, that is, before it is transformed
or deformed so that they "stick" properly. The outline in blue
indicates the current uvs. It will display when you have the
manipulator button selected as well as the uv node.
The outline in blue
indicates the current uvs. It will display when you have the
manipulator button selected as well as the uv node. Here
a principled shader is assigned in the material node. The texture is
referenced in the shader.
Here
a principled shader is assigned in the material node. The texture is
referenced in the shader. Note we are using one of the
given texture which are located in the program files ( $HFS, much
the same way your local file is $HIP)
Note we are using one of the
given texture which are located in the program files ( $HFS, much
the same way your local file is $HIP)In the principled shader under the Textures tab the texture parameter is specified
$HFS/houdini/pic/Mandril.rat
rat stands for random access texture and is optimized for the mantra renderer
Example file gridImage.hipnc
 If you are using your own
texture, the path will be more like this:
If you are using your own
texture, the path will be more like this:$HIP/textures/ScreenSaver.jpg
This is refered to as a relative path. Do not use absolute paths. Since the file is relative to the hipnc file it will be able to find your textures as long as the folder structure with the hipnc is kept intact.
 In the classicshader, use
map flag is under each tab rather than a central tab as in the above
example.
In the classicshader, use
map flag is under each tab rather than a central tab as in the above
example.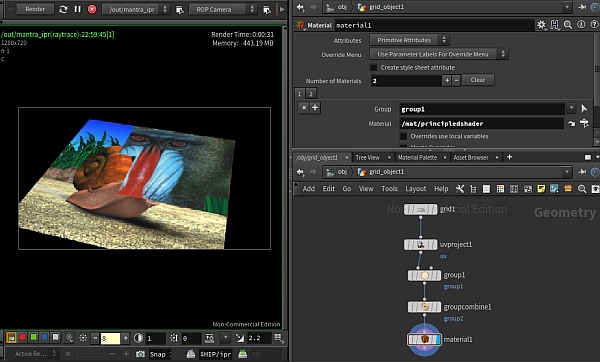 Finally, it is important to
use Groups. Groups allow a great deal of versatility when shading
your objects.
Finally, it is important to
use Groups. Groups allow a great deal of versatility when shading
your objects.Here I have taken that same grid, selected and grouped (by selected in the viewport, pressing tab and typing group) some faces. These are then assigned a different shader that the other primitives of the grip. Note that only one material node is required to assign the shaders to the different groups.
Example file gridImageGroups.hipnc
 The
same technique can be used on any geometry, for example, in this
case the groups were also used to set the uv attributes for the
faces.
The
same technique can be used on any geometry, for example, in this
case the groups were also used to set the uv attributes for the
faces.The top green face is uv'd in uvProjectTop
 The
front yellow face is uv'd in uvProjectFront
The
front yellow face is uv'd in uvProjectFrontThese then can be used to assign the materials to these groups and their uv attributes will be specific for that group.
Example file usingGroupForCubeFaces.hipnc

An example from H18 for uv'ing walls using both the uvproject and the uvtexture node quickTextureForWalls.hipnc
Note that the uv nodes are simply adding an attribute, DO NOT MERGE or it duplicates geometry.