Deborah R. Fowler
Houdini Interface Tips:
Posted 2013
Updated on April 3 2025
Check out the shot sculpt tip and lit spheres on Paul Esteves - 8 Houdini Tips (July 8/2022) https://www.youtube.com/watch?v=loAvP68H8SM
TIP Similar to mantra, karma has a render region - on the left side of the viewport window (you may need to scroll down the arrows)
TIP Interface improvements H19 and up
- vex window can be zoomed in and out with ctrl + and ctrl -
- vex window you can add comments multiline using ctrl + /
- reminder use ctrl t to create another tab and pin it for easy access to network, shop, out etc
- lit spheres - use this to display points as spheres
with proper pscale
For more information on Houdini env variables go to:
- https://www.sidefx.com/docs/houdini/ref/env.html
- https://www.sidefx.com/docs/houdini/basics/config_env.html
TOP BAR DISAPPEAR (and other shelf tools)
TIP: you can set the environment variable HOUDINI_UISCALE to a larger value for demos (tested on Windows 10)
- Open Command Line Tools from the Side Effects Folder
- type in "set HOUDINI_UISCALE=150"
- type in "houdini"
SPACEBAR (or ALT as of H12.5up) for the camera view manipulation
Copy a node with full references? shift
ctrl fn alt and drag mouse OR right-click
the node and Actions/Create Reference Copy
Edges? H14 and up - read viewport
instructions.
Function name help? In a textport window use exhelp. For example, exhelp opinputpath.
Grouping geometry? Select parts,
then hit tab in the scene view and select group
Promoting parameters In VOPS? MMB to promote parameter, RMB to expose parameter
VOPS short names? Edit -> Preferences -> Network Editor, Nodes, and Trees uncheck the checkbox that says Show Full Input and Output Names on VOP nodes. (can also be set in houdini.pref file with tiles.fullinoutnames.val := 0; see forum post).
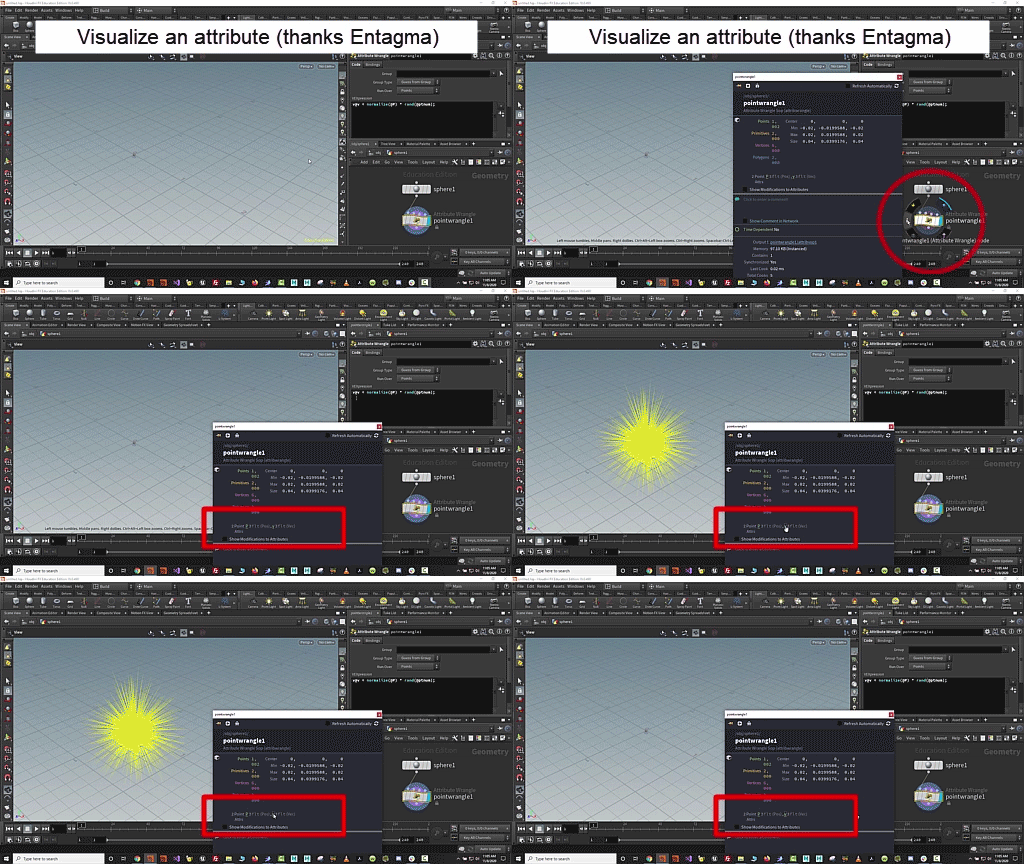
Visualizing Information
On the information popup you can click on the attribute to see it in the viewport - thanks Entagma

A short list of commonly used hot keys below: (updated for H14, now H19)
Hot Keys |
View |
Result
- toggle the key for
turning on and off |
| select alt
drag |
network |
select nodes and then alt
drag from bottom dot to create merge Thanks
@simon_houdini |
| a and drag |
network |
hold a and drag the mouse to
align nodes (or select them) Thanks @simon_houdini |
| c | network |
gives the color palette |
| y | network |
hold to give you scissors to disconnect nodes |
| alt(on wire) | network |
adds an elbow (delete to get rid of it while selected) |
| r and lasso select | network |
toggles display (w will toggle template, q or b toggles bypass) |
| p | network |
displays the parameters for the selected node |
| g or h | network |
g home selected, h home all |
| shift-r |
network |
swaps the inputs to the
merge node for example - click on merge node, shift-r |
| shift-s | network |
toggles
between the straight or rounded wiring style |
| ctrl f |
network |
allows you
to search your node network for a name |
| other options |
network |
use the
eyeball for various display settings such as the
node ring display |
| l |
network |
tidies (lines up) the network (but beware of network
boxes and stickies - ignored) |
| ctrl-enter |
network |
commit changes to vexpressions or text in the font
node |
| arrows |
network |
arrows beside context
listing allows you to go back and forth between contexts |
| ctrl | scene view |
ctrl clicking an object from the create shelf tool
will put is it at the origin (just as clicking the object and then hitting enter does) |
| e - r - t |
scene view |
scale - rotate - translate |
| ctrl-shift |
scene
view |
grab multiple elements |
| double
LMB |
scene view |
grab an edge and
double click LMB to select edge loop |
| 2-3-4 |
scene view |
selection of points, edges, primitives |
| lit spheres |
display option |
thanks to Paul Esteves 8
tips - shows points as spheres with pscale value |
Note that if you hold ctrl down and click on a light it takes the position currently in the viewport
bundle list is like a selection set
parameter spreadsheet - easy place to manipulate multiple values
TIP: USE the data tree for light linking (new data tree works with instanced lights - "light linker" should not be used - use data tree instead)
Looking for details view In pops in dops? you can access the "details view" by right clicking the node and selecting the spreadsheet. NOTE In H14 and up it is now called the Geometry Spreadsheet.
TIP: (use CTRL-ENTER to commit changes in the vex snippet window, also works on the font node)
pre-made snippets are contained in the multi-line editor drop-down menu
Have a favorite Houdini tip? email me and I'll add it to the list.
Not that you'd ever want to do this ;-), but if you bring in an fbx from Maya you can use the Pre-Flight Scene under the Render menu to resolve file references (Thanks Drew!)
