Deborah R. Fowler
Eclipse on Windows
for C++
Updated on Dec 21 2012Updated on Feb 19 2015
Installing
Eclipse
If you do not wish to use an IDE
such as Visual Studios or Eclipse, you can also compile in a more
"linux like" manner on windows using the gnu compiler.
Instructions here.To install Eclipse, simply download from the source page. You will need to have java installed. Unzip the folder and run eclipse.exe. (You will likely have to have the folder on the top level of your directory or it will give you a filename too long error when extracting).
You will also need the gcc compiler (see page on installing the gnu compiler).
Eclipse allows you to run cpp files similar to Visual Studio or with user defined Makefiles. What is a Makefile? A make file is a way of managing files that are used to "make" or build a C++ executable program. IDEs typically handle this management process.
Getting Started (instruction for a IDE managed project):
1. Click on eclipse.exe. If it gives you a "... Java Runtime Environment (JRE) ... " error, download here selected the JRE download appropriate for your machine. It will ask which folder to set up as your workspace - select as appropriate. When you run eclipse, it will ask you to Select a workspace. Once elipse is running do the following:
2. Select File / New / Project
This brings up a dialog box.
3. Now expand the C/C++ Project folder and click on C++ Project then hit next (or just double click)
At this point it will open to GNU Autotools/ Empty Project on the left and Toolchains GNU Autotools Toolchain on the right. This is NOT what you want.
4. Expand the folder labeled Executable (the little arrow to the left of it - clicking won't work)
and select either Empty Project or Hello World C++ Project (a good starting point). Once you have selected the Project type on the left a list of Toolchains appears on the right.
It is essential to click on MinGW GCC for the Toolchains selection before proceeding. You also need to give a name in the Project name field at the top. Now Select Finish.
You should now see a display with the list of projects on the left, a code editing window in the middle and an error or "Problems" screen at the bottom.
Click on the
Tips:
If you make a change to your code and hit build, it will not acknowledge this change until you save the cpp file. This behavior is different from Visual Studios. However if you hit run it will tell you that the cpp file is changed and force a build at that point.You can also create a project that allows you to control the makefile. These steps are included in the documentation if you look under Help/ C++ Development User Guide.
1. Follow Steps 1-3 as above. Now expand the folder labeled Makefile project and select empty project. Make sure it creates the include folder pointing to mingw. It appears that this method is not the most robust. The "Hello World" version is a good template to start with.
Adding OpenGL/Glut functionality to Eclipse on WINDOWS:
NOTE: ***The glut installed for Visual Studios differs from the one used for Eclipse***You can have both VS and Eclipse working on Windows, but if you want to use Eclipse with openGL/glut please install the glut from here. On Martin Paynes's site, search for the heading:
"Setting Up GLUT for Win32 With MinGW" and you will see GLUT MinGW package. Download and Unzip this folder.
In your MinGW folder create a folder called GLUT and copy the include and lib folders to it. If you have already copied glut32.dll into Window/SysWOW64 (or System32) from the Visual Studios version, do not copy this one over.
Now, assuming everything is set up correctly as described above, fire up Eclipse
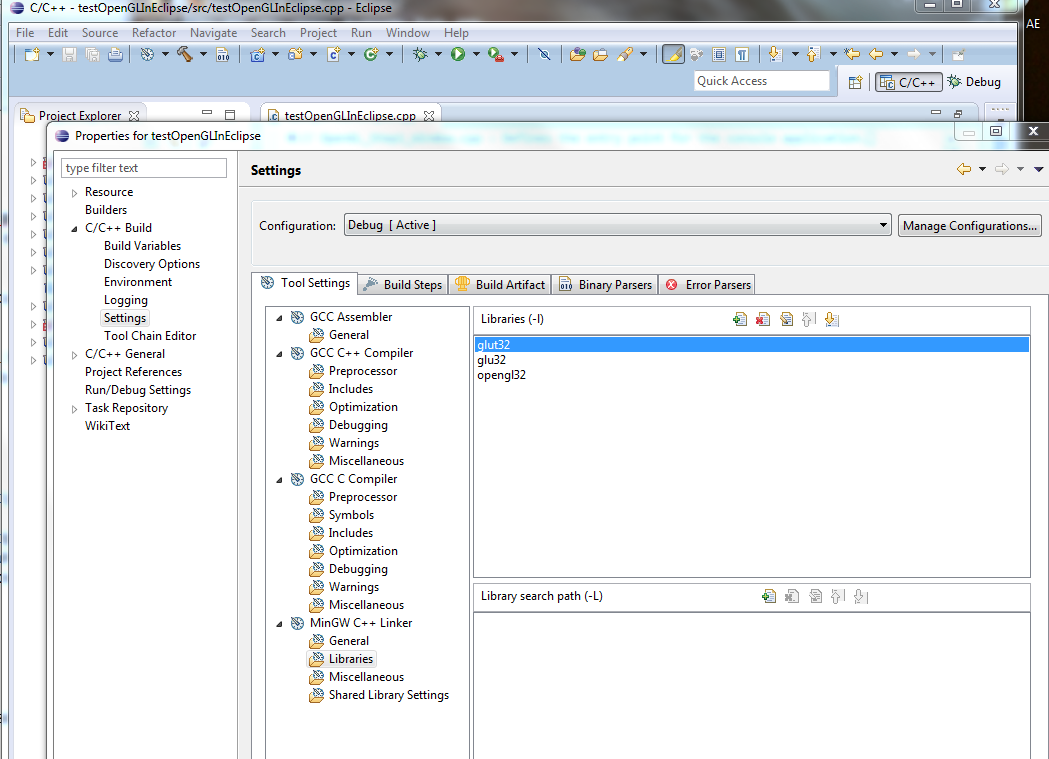
Under Project -> Properties
Expand C/C++ Build on the left of the dialog box
Select Settings
In the Tool Settings on the left select MinGW C++ Linker / Libraries and on the right click the + icon to add libraries
glut32
glu32
opengl32
NOTE THIS IS NOT THE SAME ON LINUX RED HAT 6! See using Linux resources.
You can also add this functionality for command line compiling in Windows.